
Main Courses
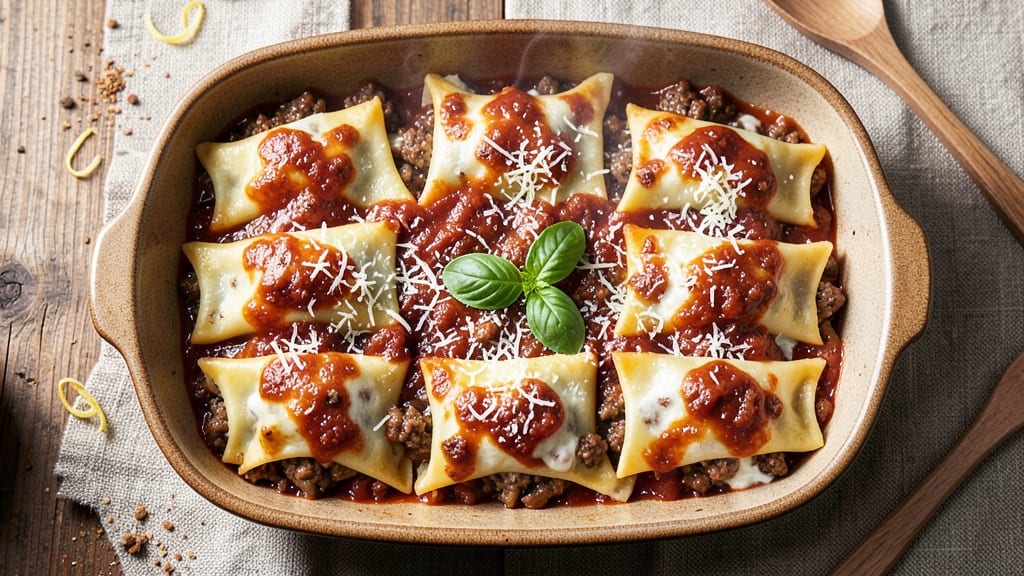
This beef and cheese manicotti recipe delivers restaurant-quality Italian comfort food with a triple-layered pasta embrace that's impossible to resist. The secret lies in perfectly seasoned ground beef filling, a blend of melted cheeses that creates a creamy, stretchy interior, and a rich tomato sauce that binds everything together.
I developed this version after years of testing—each layer must be precise to achieve that signature tender-yet-firm texture.
The process begins with cooking the ground beef until it's fully browned and seasoned with Italian herbs, then mixing it with ricotta, mozzarella, and parmesan for that signature creamy filling.
Meanwhile, the manicotti pasta absorbs the marinara sauce during baking, creating a rich tomato embrace that's both flavorful and visually stunning. This isn't just another manicotti recipe—it's the one that will have your whole family asking for seconds.
What sets this apart is the baking technique: we start with a thin layer of sauce in the baking dish, then add the filled pasta sheets in a single layer (no crowding!) before topping with more sauce and cheese.
The result is perfectly cooked pasta with a golden, bubbling cheese crust and sauce that's absorbed just enough to create that signature "saucy bite" in every forkful. Every component works together to create a dish that's both impressive and comforting.
Serve this manicotti with a simple side salad and garlic bread for a complete Italian feast. The beauty of this recipe is in its balance—rich enough to satisfy cravings, yet light enough to feel like a special occasion meal. Let's get started on creating your new favorite weeknight dinner.
Ingredients for beef and cheese manicotti
Sixteen ingredients for a dish that tastes like a restaurant chef's secret.
| Ingredient | Amount | Notes |
|---|---|---|
| Ground Beef 🥩 | 1 ½ lb | 80% lean for best flavor |
| Manicotti Pasta Sheets 🍝 | 12 whole | Uncooked, dried sheets |
| Ricotta Cheese 🧀 | 2 cups | Whole-milk preferred |
| Mozzarella Cheese 🧀 | 2 cups | Shredded, part-skim |
| Parmesan Cheese 🧀 | 1 cup | Freshly grated, block |
| Marinara Sauce 🍅 | 3 cups | Homemade or quality jarred |
| Large Eggs 🥚 | 2 whole | Room temperature preferred |
| Yellow Onion 🧅 | 1 whole | Medium size, finely chopped |
| Garlic Cloves 🧄 | 4 cloves | Fresh, minced |
| Italian Seasoning 🌿 | 1 tbsp | Dried blend preferred |
| Salt 🧂 | 1 ½ tsp | Kosher or sea salt |
| Black Pepper 🌶️ | ½ tsp | Freshly ground |
| Olive Oil 🫒 | 1 tbsp | Extra-virgin for richness |
The ground beef is non-negotiable—80% lean gives you that perfect balance of flavor and texture. Costco or Trader Joe's usually have it pre-packaged in 1.5 lb bags, which is exactly what you need. If you're buying a whole chuck roast, trim off any excess fat first. The ricotta matters too—whole-milk is creamier, but part-skim works fine. I always check the sell-by date on cheese since it's a make-or-break ingredient here. For the marinara, Rao's or Barilla are my go-tos if I'm not making my own.
No Italian seasoning? Dried oregano and basil at half the amount works in a pinch. Fresh garlic is ideal, but jarred minced garlic (the kind in tubes) is perfect for this recipe—no waste, lasts months. The mozzarella can be pre-shredded, but block cheese shreds fresher. If you're feeling fancy, grab fresh mozzarella from the deli counter—it melts like a dream. The eggs? Room temperature mix better with the ricotta, so take them out 30 minutes before using. And if you're short on time, pre-cooked manicotti tubes work too—just follow the package instructions for baking time.
This dish reheats beautifully—350°F for 15-20 minutes until bubbly. Keeps for 4 days in the fridge, freezes for 3 months if you portion it properly. I always make a double batch because it's that good. For leftovers, store in an airtight container with a sprinkle of sauce on top to keep it moist. The cheese sauce gets thicker when cold, so add a splash of milk when reheating if it's too stiff. Trust me, it's worth the extra effort.
Why You'll Love This Recipe
- No Boil Required: I swear by the no-boil trick—just soften those manicotti sheets in warm water for 2 minutes. Saves me from the pasta pot mess and the wait.
- Rich Without Effort: That ground beef simmered with garlic and Italian seasoning? It’s the star. Then the ricotta-mozzarella-Parmesan combo melts into something so creamy, you’ll forget it’s "just" manicotti.
- Weeknight Crowd-Pleaser: Between us, this feeds six but costs less than takeout. My college-aged kids devour it—no fancy plating, just layers of cheesy, meaty goodness that disappears faster than my willpower.
- Leftovers That Taste Better: Honestly, the second day is even better. The cheese gets extra gooey, and I reheat slices straight from the fridge—crispy edges, warm center. (Yes, even on a Tuesday night.)
Step-by-step instructions for triple-layered beef manicotti
Here's how to build these decadent pasta tubes with layers of flavor and texture.
Prepare the Beef Filling
Heat the 1 tablespoon olive oil in a large skillet over medium-high heat. Add the 1 whole yellow onion and cook for 5 minutes until softened and translucent. Stir in the 4 cloves garlic cloves and cook for 30 seconds until fragrant—don't let it brown or it'll turn bitter.
Add the 1.5 lb ground beef and break it apart with a wooden spoon. Cook until the beef loses its raw color, about 6-8 minutes. Drain any excess fat if needed, then stir in 1 tablespoon Italian seasoning, 1.5 teaspoons salt, and 0.5 teaspoon black pepper. The mixture should be fully cooked through with no pink remaining.
Mix the Cheese Filling
In a large bowl, combine the cooked beef mixture with 2 cups ricotta cheese, 2 cups mozzarella cheese, 1 cup parmesan cheese, and 2 whole large eggs. Use a rubber spatula to mix everything together until completely uniform. The mixture should be thick but spreadable—if it's too dry, add 1 tablespoon water at a time until it reaches the right consistency.
This is where the magic happens. The ricotta provides creaminess while the other cheeses add structure. Taste the mixture now and adjust seasoning if needed—you want it to be rich but not overly salty, as the marinara will add more flavor later.
Assemble the Manicotti
Preheat your oven to 375°F. Spread 1 cup marinara sauce on the bottom of a 9x13-inch baking dish. This creates a flavorful base that prevents sticking. Working quickly, spoon about 1 tablespoon of the cheese-beef mixture onto each of the 12 whole manicotti pasta sheets. Roll them up tightly and place them seam-side down in the baking dish.
Here's the thing—don't overstuff the tubes or they'll burst during baking. You want them snug but not packed. If the mixture is too thick to spread easily, let it sit at room temperature for 5 minutes to soften slightly. This assembly step is where patience pays off for perfect results.
Bake to Golden Perfection
Pour the remaining 2 cups marinara sauce over the assembled manicotti, pressing down gently to help it settle between the tubes. Cover the baking dish tightly with aluminum foil and bake for 25 minutes. This initial covered baking helps the pasta cook through without drying out.
Remove the foil and bake for another 10-15 minutes until the sauce is bubbling and the tops are golden brown. You'll know it's done when the edges of the pasta look crispy and the cheese is fully melted. If the sauce looks too thick, uncover for the last 5 minutes to let it reduce slightly.
Rest and Serve
Let the manicotti rest for 10 minutes before serving. This resting period allows the filling to set slightly and makes slicing much easier. The sauce will thicken as it cools, so if you prefer a looser sauce, add 2-3 tablespoons hot water before serving.
Slice into squares and serve with extra marinara sauce on the side if desired. Each bite should deliver that perfect combination of tender pasta, rich beef filling, and tangy tomato sauce. The triple-layered technique ensures every forkful is packed with flavor and texture—no soggy pasta here!
Pro Tips For Making Beef And Cheese Manicotti
- Sear the Beef First: Brown that ground beef until it’s not just cooked, but actually dark in spots—think caramelized edges, not just pink disappearing. I used to skip this for speed, but those raw bits in your filling make the whole dish taste like it was assembled in a rush.
- Drain Ricotta Like It’s 1985: Spread ricotta on paper towels and let it sit for 10 minutes before mixing it with eggs and Parmesan. The excess moisture in fresh ricotta turns your filling into a soggy mess, and nobody wants that. (Yes, even if you're impatient like me.)
- Layer the Cheese Right: Sprinkle half your mozzarella between the pasta layers, then top with the rest before baking—this guarantees melty, stretchy cheese in every bite, not just a sad, dry crust. I learned this the hard way after a batch where the top was perfect and the inside was rubbery.
- Bake Covered, Then Uncovered: Start with foil on tight for 20 minutes to melt the cheese evenly, then uncover and crank the broiler for 2-3 minutes. This two-step method prevents a sad, watery top while still getting that golden crust. (Your future self will thank you.)
Serving suggestions for this recipe
Classic Italian Sides
Start with a simple arugula salad dressed with lemon vinaigrette—its peppery bite cuts through the richness beautifully. Toss 4 cups baby arugula with 2 tablespoons extra-virgin olive oil, 1 tablespoon lemon juice, and a pinch of flaky sea salt.
For extra flavor, add 1 tablespoon grated parmesan and 3 thin slices prosciutto. 🥗
Garlic bread is a must—nothing complements manicotti like warm, buttery crust. Use a baguette or ciabatta, split lengthwise, and brush with 4 tablespoons melted butter mixed with 2 minced garlic cloves and 1 teaspoon Italian seasoning. Toast under the broiler for 2-3 minutes until golden and crisp.
Fresh Vegetable Balance
Add a roasted vegetable medley to lighten the meal. Toss 1 lb baby potatoes, 1 zucchini, and 1 red bell pepper with 2 tablespoons olive oil, 1 teaspoon Italian seasoning, and ½ teaspoon black pepper.
Roast at 400°F for 25 minutes until caramelized. The sweetness contrasts perfectly with the savory manicotti.
Cheesy Complements
For a decadent pairing, serve with creamy polenta—its mild, buttery texture balances the rich filling. Cook 1 cup polenta in 4 cups chicken broth until thick, then stir in 2 tablespoons butter and ¼ cup grated parmesan. Top with crispy fried sage leaves for a restaurant-worthy touch.
Sauce Variations
Offer white wine reduction on the side for those who prefer a lighter option. Simmer 1 cup dry white wine with 1 cup chicken broth, 1 tablespoon butter, and 1 shallot until reduced by half.
Finish with 1 tablespoon heavy cream and a splash of lemon juice. Drizzle over manicotti just before serving. ✨
Dessert Pairings
End the meal with tiramisu or panna cotta—both complement the richness without overwhelming. For a lighter option, serve affogato (espresso-drowned vanilla gelato) with a sprinkle of cocoa powder. The contrast of hot and cold, bitter and sweet, leaves everyone satisfied.
Nutrition facts
Frequently asked questions
Can I use pre-cooked manicotti tubes instead of fresh pasta sheets?
Yes, you can absolutely use pre-cooked tubes to save time! Just follow the package instructions for baking time, which is usually 10-15 minutes less than fresh sheets. The key is to bake them uncovered for the last 5-10 minutes to get that golden crust. Pre-cooked tubes work especially well if you're making this ahead or need a quicker weeknight meal.
What if my manicotti filling is too thick to spread on the pasta?
If the mixture feels too stiff, let it sit at room temperature for 5-10 minutes to soften slightly. You can also add 1 tablespoon water or milk at a time until it reaches a spreadable consistency. The filling should be thick but still pipeable—think of it like thick cake batter. Overmixing after adding liquid can make it tough, so just stir gently until combined.
How do I prevent my manicotti from getting soggy?
Sogginess happens when too much moisture gets trapped during baking. To avoid this, don't overfill the pasta tubes and use less sauce initially—just enough to coat the bottom of the dish. Bake covered for 25 minutes first to cook the pasta through, then uncover for the last 10-15 minutes to let excess moisture evaporate. A light sprinkle of breadcrumbs on top before baking also helps absorb any excess sauce.
Can I make this ahead of time and reheat it?
This recipe reheats beautifully! Assemble the manicotti and bake as directed, then let it cool completely. Store in an airtight container in the fridge for up to 4 days. To reheat, cover with foil and bake at 350°F for 15-20 minutes until bubbly. For freezing, bake the manicotti, cool completely, then wrap tightly in plastic wrap and foil. Freeze for up to 3 months—thaw overnight in the fridge before reheating.
What's the best way to adjust this recipe for a larger crowd?
Double the recipe by using a 13x18-inch baking dish instead of 9x13-inch. You'll need about 24 manicotti sheets, 3 cups marinara sauce, and increase the cheese filling proportionally. For even cooking, arrange the tubes in a single layer—don't overcrowd! If needed, bake in batches using two baking sheets at once. The key is maintaining the same thickness of sauce and cheese layers to ensure even cooking.