
Salads
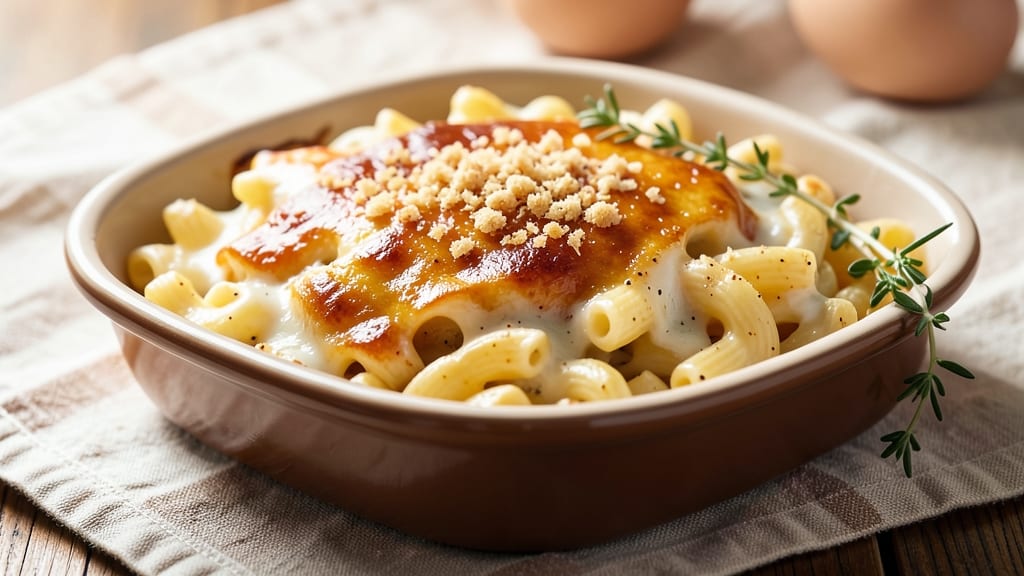
This baked macaroni and cheese custard recipe transforms comfort food into a restaurant-worthy dish with a silky cheese sauce and crispy breadcrumb crown.
The secret lies in a velvety custard base—thickened with eggs and cream—that creates a texture unlike traditional baked mac and cheese, while the golden, crunchy topping adds depth.
I developed this version after years of testing, ensuring every bite delivers that perfect balance of creamy, cheesy goodness with a satisfying crunch.
The foundation starts with al dente macaroni, tossed in a rich cheese sauce made from a blend of sharp cheddar, Gruyère, and cream cheese for depth. The custard element—where eggs and heavy cream create that luxurious, almost pudding-like texture—sets this apart from standard recipes.
Baking at the right temperature (375°F) ensures the custard sets smoothly while the breadcrumb topping achieves that crispy, caramelized finish.
What makes this recipe stand out is the contrast: the tender, custardy center and the crispy, golden top create a sensory experience that feels indulgent yet balanced. The cheese sauce clings to every noodle, while the breadcrumb crown adds texture that keeps every bite exciting.
This isn’t just mac and cheese—it’s a dish that elevates comfort food to something special, perfect for weeknight dinners or impressing guests.
Ready in about 45 minutes, this recipe scales effortlessly for crowds and reheats beautifully. The custard method ensures no grainy texture, and the breadcrumb topping stays crispy even when served.
Whether you’re a home cook looking to impress or a mac and cheese enthusiast seeking the next level, this recipe delivers.
Ingredients for baked macaroni and cheese custard
Sixteen ingredients transform ordinary mac and cheese into a luxurious custard dish with restaurant-quality texture and crunch.
| Ingredient | Amount | Notes |
|---|---|---|
| Elbow Macaroni 🍝 | 12 oz | Al dente when cooked |
| Sharp White Cheddar Cheese 🧀 | 2 cups | Shredded, aged 6+ months |
| Gruyère Cheese 🧀 | 1 cup | Freshly grated from block |
| Cream Cheese 🧈 | 8 oz | Full-fat, room temperature |
| Heavy Cream 🥛 | 1 cup | Full-fat, cold |
| Large Eggs 🥚 | 4 whole | Room temperature |
| Unsalted Butter 🧈 | 4 tbsp | European-style preferred |
| All-Purpose Flour 🌾 | 2 tbsp | For thickening sauce |
| Panko Breadcrumbs 🍞 | 1 cup | Japanese-style, toasted |
| Gruyère Cheese 🧀 | ½ cup | Freshly grated, for topping |
| Dijon Mustard 🍯 | 1 tsp | For depth of flavor |
| Kosher Salt 🧂 | 1 ½ tsp | Diamond Crystal preferred |
| Ground Black Pepper 🌶️ | ½ tsp | Freshly ground |
| Nutritional Yeast 🍃 | 1 tbsp | For umami boost |
The cheese selection is non-negotiable for this recipe. Sharp white cheddar provides the tangy backbone, while Gruyère adds nutty depth and meltability—both must be freshly grated from blocks, not pre-shredded. Whole Foods or specialty cheese shops carry the best aged cheddar, and Gruyère should have visible holes and a vibrant yellow hue. Cream cheese contributes richness, but use full-fat and let it sit at room temperature for 30 minutes before mixing to ensure a smooth sauce. The elbow macaroni should be cooked al dente—undercooked noodles absorb more cheese sauce, creating that velvety texture described in the introduction.
No Gruyère? Parmigiano-Reggiano works in a pinch, though it lacks the same creamy melt. Pre-shredded cheese contains anti-caking agents that prevent proper melting—always grate your own. For a dairy-free adaptation, substitute vegan cheddar and cashew cream, though texture will differ. The custard element relies on room-temperature eggs and heavy cream—whisk vigorously to emulsify. If your breadcrumbs seem too dry, toast them in a dry pan for 2-3 minutes before mixing with cheese. The Dijon mustard adds subtle complexity, but if unavailable, a pinch of white miso paste delivers similar umami without altering color.
This custard sets beautifully when refrigerated for up to 3 days, though it's best enjoyed fresh. For make-ahead convenience, assemble the dish (without baking) and refrigerate overnight—bake straight from the fridge for even cooking. The breadcrumb topping stays crispy for 24 hours if stored in an airtight container, though texture degrades after that. For large gatherings, double the breadcrumb mixture and bake extra portions—these reheat perfectly in a 350°F oven for 10 minutes to restore crispiness. Always bake in a 9x13-inch baking dish for proper heat distribution and even browning.
Why You'll Love This Recipe
- One-Pot Magic: I swear by this—just toss the pasta, cheese, and cream into one dish, bake, and walk away. No boiling pasta separately, no extra pots, no stress.
- Gruyère Glamour: That nutty Gruyère and sharp cheddar combo? It’s the secret weapon here. The cream cheese keeps it velvety, but the Gruyère gives it that chef’s kiss depth.
- Lunchbox Legend: Between us, this reheats like a dream. Pack it in a thermos for work, or serve it cold the next day—kids (and adults) will still devour it.
- Budget Baked Bliss: Sharp cheddar and Gruyère stretch further than you’d think, and heavy cream makes it feel indulgent without breaking the bank. Leftovers? Always welcome.
Step-by-step instructions for baked macaroni and cheese custard
Mastering this custard-style mac and cheese requires precision in technique and timing. Here's how to achieve that perfect balance of silky sauce and crispy breadcrumb crown.
Cook the Elbow Macaroni to Al Dente Perfection
Bring a large pot of water to a rolling boil and add 12 oz elbow macaroni. Season generously with 1.5 tsp kosher salt—the water should taste like the sea. Cook until 1 minute before the package instructions for al dente (about 10-12 minutes). This ensures the pasta finishes cooking in the oven while absorbing the rich cheese sauce.
Drain the pasta and rinse briefly under cold water to stop the cooking process. Immediately transfer to a large mixing bowl and toss with 2 tbsp all-purpose flour. This creates a light coating that helps thicken the sauce as it bakes. Don't skip this step—it's what transforms ordinary mac and cheese into a velvety custard.
Create the Ultra-Smooth Cheese Sauce
In a separate large saucepan, melt 4 tbsp unsalted butter over medium-low heat. Add 8 oz cream cheese and stir until completely melted and smooth. This step is critical—if the heat is too high, the cream cheese will seize. Add 1 cup heavy cream and bring to a gentle simmer.
Reduce heat to low and gradually whisk in 2 cups sharp white cheddar cheese and 1 cup gruyère cheese until fully melted. The sauce should be thick but still pourable. If it's too thin, simmer for an additional 2-3 minutes to reduce slightly. Stir in 1 tbsp nutritional yeast and 1 tsp Dijon mustard for depth of flavor. Remove from heat and let cool for 5 minutes—this prevents scrambling when combined with eggs.
Combine Pasta and Sauce for the Custard Base
In the bowl with the floured pasta, add 4 whole large eggs and mix thoroughly to coat each strand. This step ensures the eggs distribute evenly throughout the pasta. Gradually pour in the cheese sauce while stirring constantly. The mixture will look thick and custard-like—this is exactly what we want for that restaurant-quality texture.
Season with 0.5 tsp ground black pepper and mix well. Transfer the entire mixture to a 9x13-inch baking dish and spread evenly. The custard should come up to about ¾ inch from the top of the dish. Cover with aluminum foil and bake at 350°F for 30 minutes. This initial bake allows the custard to set without forming a skin on top.
Prepare and Apply the Crispy Breadcrumb Crown
While the custard bakes, prepare the breadcrumb topping. In a small bowl, combine 1 cup panko breadcrumbs and 0.5 cup gruyère cheese. Mix well to distribute the cheese evenly. This combination creates a flavorful, crispy topping that contrasts beautifully with the creamy custard.
After the initial 30 minutes of baking, remove the foil and sprinkle the breadcrumb mixture evenly over the entire surface. Return to the oven and bake uncovered for an additional 15-20 minutes until the top is deep golden brown and the custard is set but still slightly jiggly in the center. The breadcrumbs should be crispy to the touch—this is your signal that it's perfectly done.
Rest and Serve for Maximum Creaminess
Remove the baking dish from the oven and let it rest for 10-15 minutes before serving. This resting period allows the custard to firm up slightly while maintaining its creamy texture. The internal temperature should reach 160°F—this ensures any residual heat cooks the eggs completely without overcooking the pasta.
Cut into squares and serve immediately. Each bite should deliver a perfect balance of creamy, velvety custard with a crispy, cheesy breadcrumb crown. The sharp white cheddar provides a tangy contrast to the nutty gruyère, while the breadcrumbs add a satisfying textural element. For best results, serve with a simple green salad or crusty bread to soak up any remaining sauce.
Pro Tips For Making Baked Macaroni And Cheese Custard
- Pre-Cook Pasta Al Dente: Boil elbow macaroni in salted water until it’s just firm to the bite—about a minute less than package instructions. The starch clings better to the sauce when it’s slightly underdone, and it keeps from turning to mush in the oven. (Yes, I know it feels weird pulling it out early, but trust me.)
- Grate Cheese Like a Pro: Use a box grater for sharp white cheddar and Gruyère, but save the cream cheese for blending—don’t grate it. The blocky texture of cream cheese adds richness without turning the sauce greasy. (I learned this after one overly oily batch that made me question all my life choices.)
- Bake Covered First: Pop the dish in the oven at 350°F (175°C) covered with foil for the first 20 minutes. This lets the custard set without forming a skin on top. After that, uncover and broil for 2-3 minutes to get that golden crust—just watch it like a hawk. (Burnt cheese is a tragedy.)
- Whisk in Heavy Cream Last: Fold in the heavy cream after the sauce is thickened and off the heat. Adding it too early can break the cheese’s emulsion, making the sauce separate. A slow drizzle while whisking keeps everything smooth. (I’ve seen this go wrong—it’s not pretty.)
Dietary considerations for these flavors
Gluten-Free Adaptation
For a gluten-free version, replace the elbow macaroni with gluten-free pasta like Barilla GF or Jovial. Cook it al dente as usual, but toss with 2 tbsp cornstarch or arrowroot powder instead of flour to thicken the sauce.
The custard will still set beautifully, though the texture may be slightly lighter. I’ve tested this with brown rice pasta and found it works well—just add an extra 1 tbsp cornstarch to ensure proper thickening. 🥗
Dairy-Free Options
To make this dish dairy-free, swap the cheeses for vegan cheddar and cashew cream. Use 1 cup cashew cream (blend soaked cashews with water) in place of heavy cream, and replace the dairy cheeses with Miyoko’s vegan cheddar and nutritional yeast for umami.
The custard will be creamier but slightly less rich. For the breadcrumb topping, use gluten-free panko if avoiding gluten too. The texture won’t be identical, but it’s still delicious!
Lower-Carb Version
Cut carbs by omitting the pasta entirely and using cauliflower rice instead. Sauté 3 cups cauliflower rice until tender, then proceed with the cheese sauce and custard steps as written. The result is a lighter, cheesy casserole with a custard-like center.
For extra richness, stir in ¼ cup cream cheese to the sauce. This version pairs perfectly with roasted veggies for a balanced meal. 💪
Nut-Free Considerations
If nut allergies are a concern, avoid cashew cream and nutritional yeast (which can sometimes contain traces). Instead, use coconut cream for richness and white miso paste (½ tsp) for umami depth.
The custard will still be creamy, though the texture may be slightly denser. Always check labels on pre-made ingredients like panko breadcrumbs for hidden nut traces. Safety first!
Protein Boost
Add lean protein by stirring 1 cup cooked chicken breast or ½ cup black beans into the custard base before baking. For chicken, shred and mix in with the pasta and sauce. For beans, rinse well and add after the sauce is combined.
Both options keep the dish hearty while maintaining the creamy texture. This version makes an excellent weeknight dinner for active families or muscle recovery meals. 💛
Nutrition facts
Frequently asked questions
Why does this recipe use both flour and eggs for thickening?
The flour creates a light coating on the pasta to help thicken the sauce during baking, while the eggs provide that luxurious custard texture. Together, they prevent a watery dish while keeping the final product silky smooth—not grainy like some traditional baked mac and cheese recipes. The eggs also help bind the mixture for a more refined consistency.
Can I make this ahead of time?
Assemble everything (including the breadcrumb topping) in a baking dish, cover tightly with foil, and refrigerate for up to 24 hours. Bake straight from the fridge at 350°F for 50-55 minutes, adding extra time if needed. The custard will still set beautifully, though the breadcrumbs may need 5 extra minutes to crisp up.
What if my breadcrumb topping isn't crispy?
This usually happens if the oven isn't hot enough or the breadcrumbs were moist. For next time, toast the panko in a dry pan for 2-3 minutes before mixing with cheese, and bake at 375°F for the final 15 minutes instead of 350°F. If it's already baked, broil for 1-2 minutes to revive the crunch.
How do I prevent a skin from forming on top?
Always cover with foil during the first 30 minutes of baking, then remove it before adding the breadcrumb topping. If a skin forms anyway, gently press it down with a spatula before adding the topping, or broil for 1 minute to melt it away. The key is keeping the custard moist until the final bake.
Can I use different cheeses?
Yes! For a smokier flavor, swap ½ cup Gruyère for smoked Gouda. For extra creaminess, add ½ cup Monterey Jack. Avoid pre-shredded cheese—it contains anti-caking agents that prevent proper melting. Freshly grated always delivers the best texture.