
Appetizers
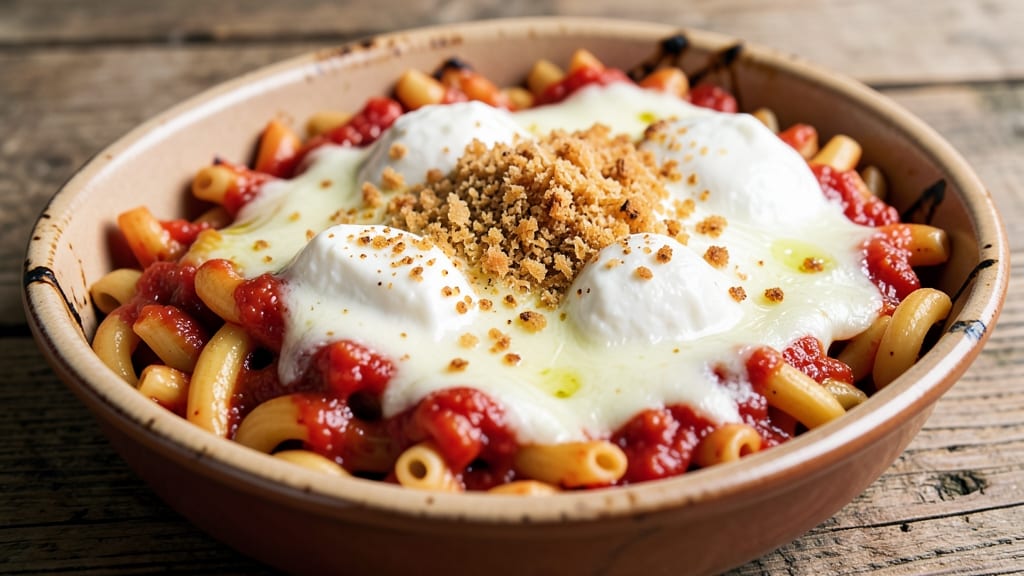
This baked rotini and cheese recipe transforms simple ingredients into a crispy, golden-topped casserole that’s ready in 30 minutes—no fancy techniques required. The secret lies in perfectly cooked rotini, a rich marinara base, and a buttery breadcrumb topping that creates that irresistible crunch.
I developed this recipe during a busy weeknight when I needed a crowd-pleasing dish that felt indulgent but came together effortlessly.
The beauty of this one-pan pasta bake is its foolproof nature—no boiling pasta separately or worrying about uneven baking. Rotini holds its shape beautifully, soaking up the marinara and melted cheese while developing a crispy, golden crust on top.
The breadcrumbs add texture and depth, ensuring every bite delivers that satisfying contrast between creamy cheese and crunchy topping.
What you’ll end up with is a restaurant-quality dish that’s creamy, cheesy, and packed with flavor—ideal for feeding a family or impressing guests with minimal effort. The aroma alone will have everyone gathering around the table, and the leftovers reheat perfectly for lunch the next day.
Ready to make this easy, crispy masterpiece? Let’s get started with the ingredients and step-by-step instructions that guarantee success every time.
Ingredients for baked rotini and cheese
Pantry staples and fresh herbs create this restaurant-quality one-pan pasta masterpiece.
| Ingredient | Amount | Notes |
|---|---|---|
| Rotini Pasta 🍝 | 12 oz | Uncooked, short cut preferred |
| Marinara Sauce 🍅 | 2 cups | High-quality, no added sugar |
| Shredded Mozzarella Cheese 🧀 | 2 cups | Part-skim or whole milk, low-moisture |
| Ricotta Cheese 🧀 | ¾ cup | Whole-milk for creaminess |
| Parmesan Cheese 🧀 | ½ cup | Freshly grated, fine texture |
| Italian Seasoned Breadcrumbs 🍞 | ¾ cup | Panko-style for extra crispiness |
| Unsalted Butter 🧈 | 2 tbsp | Melted, for breadcrumb mixture |
| Garlic Cloves 🧄 | 2 cloves | Minced, for added depth |
| Fresh Parsley 🌿 | ¼ cup | Chopped, for garnish |
| Dried Oregano 🌿 | ½ tsp | Italian blend preferred |
| Ground Black Pepper 🌶️ | ¼ tsp | Freshly cracked |
| Diamond Crystal Kosher Salt 🧂 | ½ tsp | For seasoning and balance |
| Vegetable Oil 🫒 | 1 tbsp | For greasing baking dish |
The rotini is non-negotiable here—its short cut holds shape perfectly while soaking up marinara. De Cecco or Barilla are my go-tos for consistent texture. For the marinara, Rao's or a homemade batch with San Marzano tomatoes elevates the dish. The cheeses are where flavor peaks: low-moisture mozzarella prevents a soggy topping, while whole-milk ricotta adds luxurious creaminess. Freshly grated Parmesan is essential—pre-shredded contains anti-caking agents that ruin the texture. Whole Foods or specialty cheese shops carry the best options.
No Italian breadcrumbs? Panko mixed with dried oregano works beautifully—just toast it first for deeper flavor. Substituting ricotta? Cottage cheese blended smooth mimics the texture, though it lacks richness. For a dairy-free option, cashew cream (soaked cashews blended with lemon juice) replaces ricotta perfectly. The garlic can be roasted for a sweeter profile—simply toss minced cloves with olive oil and roast at 400°F for 8 minutes before adding. Fresh parsley isn't strictly necessary but brightens the dish; dried at one-third the amount suffices in a pinch.
Prep ahead for foolproof results: Cook the rotini al dente (1 minute less than package instructions), then toss immediately with olive oil to prevent sticking. The breadcrumb topping should be made fresh—mix melted butter, breadcrumbs, garlic powder, and a pinch of salt just before baking. This dish reheats beautifully; cover with foil and warm at 350°F for 10 minutes. For make-ahead convenience, assemble the casserole (without baking) and refrigerate for up to 24 hours—bake straight from the fridge, adding 5-7 minutes to the cooking time.
Why You'll Love This Recipe
- Here’s what sold me: the ricotta’s creamy pull against the sharp parmesan and melty mozzarella. It’s like a hug in a baking dish—rich but not heavy, tangy but not overpowering. (Yes, even on a Tuesday night, this feels like a treat.)
- No Boil Needed: I swear by this—just toss the rotini raw into the marinara and ricotta, then bake. No draining, no fuss, no waiting for water to boil. The pasta soaks up the sauce perfectly while it cooks, and you end up with that just-right texture where every bite is tender but still has a little bite.
- Cheesy Magic Combo: Here’s what sold me: the ricotta’s creamy pull against the sharp parmesan and melty mozzarella. It’s like a hug in a baking dish—rich but not heavy, tangy but not overpowering. (Yes, even on a Tuesday night, this feels like a treat.)
- Lunchbox Hero: Between us, this is my go-to for meal prep. Pack it warm or cold—it reheats like a dream—and the rotini holds up better than most pasta. My kids grab it for school lunches, and honestly? They always finish their plates. That’s the real test.
Step-by-step instructions for baked rotini and cheese
Master this one-pan technique for perfectly tender pasta with a golden, crispy breadcrumb topping.
Cook the Rotini Al Dente
Bring a large pot of well-salted water to a rolling boil using 8 cups water (enough to generously cover the pasta). Add the 12 oz rotini pasta and cook until 1 minute before the package instructions for al dente. This ensures the pasta finishes cooking in the oven while absorbing flavors from the sauce.
Drain the pasta in a colander, reserving 1 cup of pasta water. I always keep this starchy water nearby—it's essential for creating a silky sauce when mixed with the ricotta. Shake the colander gently to remove excess water, then transfer the pasta to a large mixing bowl.
Combine Pasta with Cheese and Sauce
In the same bowl with the cooked pasta, add the 2 cups marinara sauce, 2 cups shredded mozzarella cheese, 0.75 cup ricotta cheese, 0.5 cup parmesan cheese, 0.5 tsp dried oregano, 0.25 tsp ground black pepper, and 0.5 tsp diamond crystal kosher salt. Using tongs or a wooden spoon, gently fold everything together until the cheese melts slightly and the mixture is fully coated.
If the mixture appears too dry, add 1-2 tablespoons of the reserved pasta water at a time until you achieve a creamy consistency that clings to the pasta. The ricotta adds creaminess, but the pasta water helps bind everything together without making the dish soggy.
Prepare the Crispy Breadcrumb Topping
In a separate bowl, combine the 0.75 cup italian seasoned breadcrumbs, 2 tbsp melted unsalted butter, 2 cloves minced garlic cloves, and 2 tablespoons of the reserved pasta water. Mix until the breadcrumbs are evenly moistened but not dripping. This creates a crispy, flavorful crust that seals in moisture during baking.
Spread the breadcrumb mixture evenly over the pasta in the mixing bowl, pressing down gently to ensure good contact. This layer will become the signature crispy topping that contrasts beautifully with the creamy pasta underneath.
Assemble and Bake to Perfection
Preheat your oven to 375°F. Grease a 9x13-inch baking dish with 1 tablespoon vegetable oil, then transfer the pasta mixture into the dish, spreading it evenly. The oil prevents sticking and helps create a crispy bottom layer.
Bake uncovered for 25-30 minutes until the edges are golden brown and the breadcrumb topping is crispy. The pasta should be bubbling around the edges, and the cheese should be fully melted with a slight brown color on top. If the topping browns too quickly, tent loosely with foil for the last 5-10 minutes of baking.
Rest and Garnish
Remove the baking dish from the oven and let it rest for 5 minutes before serving. This resting period allows the cheese to set slightly, making it easier to slice and serve without losing the crispy topping. The dish will continue to bubble and release its aroma during this time—resist the temptation to dig in immediately!
Garnish with 0.25 cup chopped fresh parsley just before serving. The parsley adds a fresh contrast to the rich, cheesy pasta. For best results, serve immediately while the breadcrumbs are still crispy and the pasta is piping hot.
Pro Tips For Making Baked Rotini And Cheese
- Drain pasta—then rinse: Rotini sticks to sauce like glue if you skip this. Drain, toss with a splash of cold water, and shake off excess—just until the pasta stops clinging. (Yes, even if it feels wetter than you’d like; the sauce will fix that.)
- Preheat oven to 375°F: Too low, and the cheese turns sad and greasy. Too high, and the top burns before the center melts. 375°F is the Goldilocks zone—hot enough for a crispy crust, but gentle enough to let the ricotta soften properly.
- Mix ricotta into sauce, not cheese: Dumping ricotta on top means you’ll end up with a lumpy, uncooked dollop in the middle. Stir it into the warm marinara first—it blends smoother and gets evenly distributed. (Trust me, you don’t want that one dry bite.)
- Use a mix of cheeses: All mozzarella = stretchy, all parm = dry. Shred half the mozzarella yourself (the pre-shredded kind has anti-caking agents that make baked dishes grainy), and fold in a handful of fresh parm at the end for that salty, nutty punch.
Pro cooking tips for perfect results
Pro Pasta Prep
Cook your rotini 1 minute less than package instructions for al dente perfection—it finishes cooking in the oven while absorbing marinara flavors. I swear by this trick to prevent mushy pasta.
Drain well but reserve 1 cup pasta water—this starchy liquid is liquid gold for creating a silky, creamy sauce when mixed with ricotta. 🍝
Cheese Layering Secrets
Layer cheeses strategically: Start with mozzarella at the bottom for meltiness, then add ricotta for creaminess, and finish with Parmesan on top. The ricotta should be whole-milk for that luxurious texture—part-skim lacks richness. Sprinkle Italian seasoned breadcrumbs directly on top before baking for maximum crispiness. 🧀
Breadcrumb Topping Hacks
Mix your breadcrumb topping with melted butter and 2 tbsp reserved pasta water—this creates a glue-like consistency that sticks to the pasta. Add minced garlic for depth, but don't skip the 5-minute rest before baking.
This allows the butter to fully coat the breadcrumbs, ensuring a crispy, golden crust instead of a soggy mess. 🍞
Oven Temperature Control
Bake at 375°F—any hotter risks burning the breadcrumbs before the cheese melts. If the topping browns too quickly, tent loosely with foil for the last 5-10 minutes.
The edges should be golden brown with bubbling cheese underneath. A 9x13-inch baking dish is ideal—it provides enough surface area for even browning. 🌡️
Resting for Success
Never skip the 5-minute rest after baking! This crucial step lets the cheese set slightly, preventing a runny disaster when serving. The breadcrumbs stay crispy while the pasta absorbs any excess moisture. Garnish with fresh parsley right before serving—it adds a bright contrast to the rich, cheesy pasta. ✨
Nutrition facts
Frequently asked questions
Can I use regular breadcrumbs instead of Italian seasoned?
Yes, but you'll lose some flavor depth. If using plain breadcrumbs, add 1 teaspoon dried Italian seasoning or ½ teaspoon garlic powder to the butter mixture. Toasting the breadcrumbs in a dry pan for 2-3 minutes before mixing with butter also enhances their flavor.
Why did my breadcrumb topping turn soggy?
This usually happens from one of two issues: either the breadcrumbs absorbed too much moisture (don't overmix with pasta water) or the pasta wasn't drained well enough. Always press the topping gently but firmly before baking, and ensure your rotini is cooked al dente—not mushy. A 5-minute broil at the end can also crisp up a slightly soft topping.
How can I make this dish ahead of time?
Assemble the entire casserole (including breadcrumb topping) in a baking dish, cover tightly with plastic wrap, and refrigerate for up to 24 hours. When ready to bake, add 5-7 extra minutes to the cooking time since it starts cold. For freezer prep, assemble without baking, wrap airtight, and freeze for up to 1 month. Thaw overnight in the fridge before baking.
What's the best way to reheat leftovers?
Cover with foil and warm at 350°F for 10-15 minutes—this prevents the breadcrumbs from drying out. For microwave reheating, cover with a damp paper towel and heat in 30-second intervals on medium power, stirring between each interval. The breadcrumbs won't be as crispy, but the pasta will retain its creamy texture.
Can I add protein to this recipe?
Try adding 1 cup cooked chicken breast (diced), ½ pound Italian sausage (browned and crumbled), or 8 oz frozen peas (thawed and drained) to the pasta mixture. For extra richness, fold in ½ cup cooked ground beef with the marinara sauce. Just be mindful not to overfill the baking dish—this is meant to be a one-layer casserole.