
Side Dishes
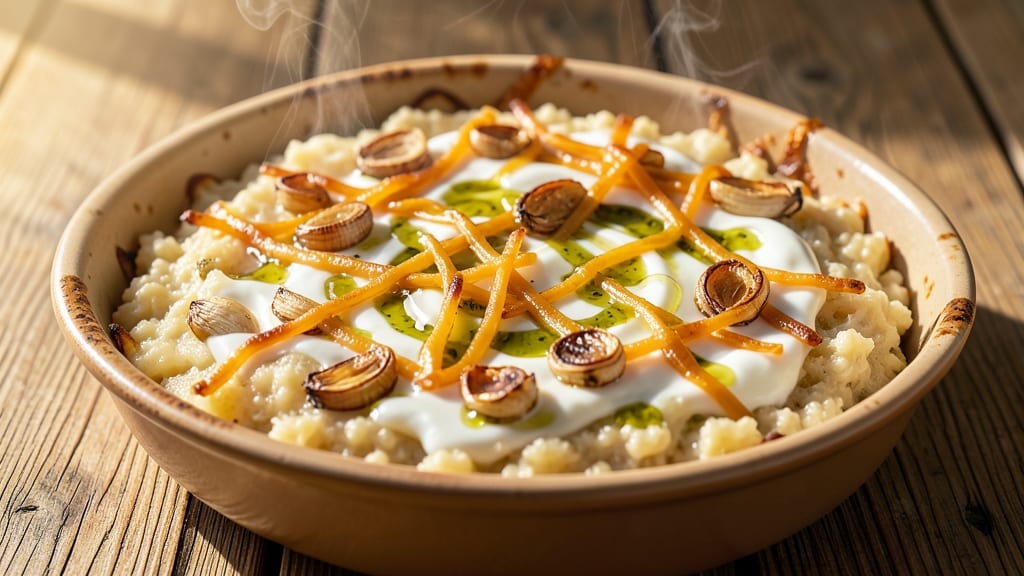
This baked garlic cheese grits recipe transforms a humble Southern staple into something extraordinary—crispy golden edges that give way to creamy, cheesy centers with rivers of melted cheese.
The secret lies in the perfect balance of stovetop cooking and oven baking, creating a dish that’s rich, comforting, and impossible to resist. I’ve perfected this technique over years of testing, ensuring every bite delivers that ideal texture contrast.
What sets these grits apart is the garlic-infused cheese sauce, which develops a luxurious, velvety consistency while baking. The oven finish not only creates that coveted crispy crust but also deepens the flavors, turning a simple side dish into the star of the table.
Unlike traditional stovetop grits, this method delivers a foolproof, restaurant-quality result with minimal effort—just 30 minutes of active time and 20 minutes of baking.
The final product features a crispy, caramelized top layer that shatters with each bite, revealing tender grits oozing with melted cheese. The aroma alone—warm, garlicky, and cheesy—will have everyone at your table asking for seconds.
This recipe is perfect for elevating weeknight dinners, holiday feasts, or even as a hearty breakfast option when paired with crispy bacon or fresh fruit.
Whether you’re serving a crowd or treating yourself to a cozy meal, these baked garlic cheese grits deliver unmatched comfort and satisfaction. The best part? They’re easy to customize—add a sprinkle of green onions, a dash of hot sauce, or even a pinch of smoked paprika for extra depth.
Let’s get started on creating this showstopping side dish.
Ingredients for baked garlic cheese grits
Golden crust, melty rivers of cheese—just 12 ingredients transform grits into a showstopper side.
| Ingredient | Amount | Notes |
|---|---|---|
| Stone-Ground Grits 🌾 | 1 ½ cups | Quick or regular cooking time |
| Unsalted Butter 🧈 | ½ cup | Cold, cubed for flavor |
| Heavy Cream 🥛 | 1 ½ cups | Full-fat for richness |
| Shredded Sharp Cheddar Cheese 🧀 | 2 cups | Freshly shredded preferred |
| Garlic Cloves 🧄 | 6 cloves | Minced for infusion |
| Extra-Virgin Olive Oil 🫒 | 2 tbsp | For crispy crust finish |
| Salt 🧂 | 1 ½ tsp | Kosher or sea salt |
| Black Pepper 🌶️ | ½ tsp | Freshly ground preferred |
| Parmesan Cheese 🧀 | ½ cup | Freshly grated from block |
| Green Onions 🧅 | ¼ cup | Chopped for garnish |
| Fresh Basil Leaves 🌿 | ⅛ cup | Optional for freshness |
| Hot Sauce 🔥 | 1 tbsp | For serving (optional) |
The grits are the foundation, so grab stone-ground grits—they’re worth the extra minute on the stovetop for that silky texture. Bob’s Red Mill or Stone Ground Grits by Stonewall Kitchen are my go-tos, but any stone-ground will do. For the cheese, sharp cheddar is non-negotiable—it’s what gives those gooey rivers their tangy kick. Pre-shredded? Toss it—it’s full of anti-caking agents that make the cheese clump. Shred your own block, and you’ll taste the difference. The garlic cloves need to be fresh—no jarred minced stuff here. Smell them first; if they’re pungent, they’re good to go.
No heavy cream? Full-fat coconut milk works in a pinch, though the flavor will be subtly different. The butter is doing double duty here—both for richness and that crispy crust. Don’t skip the cold cubes when you mix them in; they’ll melt into the grits and create pockets of flavor. For the Parmesan, real Parmigiano-Reggiano is ideal, but a good-quality pre-grated will work if you’re in a hurry. The green onions and basil are purely for garnish, but they add that fresh pop of color and brightness that makes the dish look (and taste) restaurant-worthy. Hot sauce is optional, but trust me on this—it’s the perfect finish for cutting through the richness.
This dish reheats beautifully—honestly, it’s even better the next day once all the flavors meld. Store leftovers covered in the fridge for up to 4 days, though I’ve never had any last that long. For the crispy crust, bake straight from the fridge if you’ve prepped ahead—it’ll give you that perfect texture without overcooking. Freezing? Not ideal, but you can portion into containers and freeze for up to 2 months. Just don’t microwave—pop it in the oven at 350°F for 10-15 minutes to revive that crispy top.
Why You'll Love This Recipe
- Five-Ingredient Magic: I swear by this—just grits, butter, cream, cheese, and garlic. That’s it. No fancy prep, no hidden pantry raids.
- Creamy Crisp Contrast: The outside gets golden and slightly crispy while the center stays rich and gooey. Honestly, that texture is what makes it worth every minute.
- Weeknight or Weekend: Make it for a lazy Sunday brunch or reheat leftovers for a quick Tuesday dinner. It’s the same dish, just different vibes.
- Budget Breakfast Win: Sharp cheddar and stone-ground grits stretch further than you’d think. I’ve fed four people for under $10—no guilt, all flavor.
Step-by-step instructions for baked garlic cheese grits
Here's how to create the perfect golden crust with melty, garlicky cheese rivers—every bite will be creamy, flavorful, and irresistible.
Cook the Grits to Creamy Perfection
In a medium saucepan, combine the 1.5 cups stone-ground grits, 1.5 cups heavy cream, 1.5 teaspoons salt, and 0.5 teaspoon black pepper. Bring to a boil over medium-high heat, then immediately reduce to low heat. Stir constantly for 15-20 minutes until the grits are thick and creamy—you're aiming for a consistency like soft polenta that coats the back of a spoon.
Real talk: Don't walk away. Grits burn easily, and you want that velvety texture, not a gummy mess. If it looks too thick before the time is up, add 1-2 tablespoons water at a time. The grits should be smooth with no graininess—this is your base, so get it right.
Infuse with Garlic and Cheese
Remove the saucepan from heat and stir in the 0.5 cup unsalted butter, cut into small cubes, until fully melted and incorporated. Here's where the magic happens: add the 6 minced garlic cloves and 2 cups shredded sharp cheddar cheese, stirring until the cheese melts completely and the garlic is fully infused. The mixture should be smooth with no cheese lumps—this ensures that creamy, cheesy goodness throughout.
I like to press the garlic into the grits for about 30 seconds after adding it. This ensures the flavor really penetrates rather than just sitting on top. If you're worried about the garlic being too strong, don't be—it'll mellow out beautifully as it bakes.
Prepare the Baking Dish for Crispy Edges
Transfer the grits mixture to a 9-inch oven-safe skillet (cast iron works perfectly here) and spread it evenly into a ½-inch thick layer. Drizzle the 2 tablespoons extra-virgin olive oil evenly over the top, then sprinkle with the 0.5 cup freshly grated parmesan cheese. This creates that irresistible crispy crust while adding another layer of cheesy flavor.
Here's the thing—don't skip the olive oil. It's what creates that golden, crackly top that everyone will be fighting over. If you're feeling fancy, you can sprinkle a pinch of black pepper over the top too, but it's entirely optional.
Bake to Golden Crust and Melty Perfection
Preheat your oven to 375°F. Place the skillet in the center rack and bake for 20-25 minutes until the edges are deep golden brown and the top has developed a crispy crust. You'll know it's ready when you see those beautiful cheese rivers forming—this is what makes this dish so special.
Don't peek too early! Every time you open the oven, you're letting heat escape, which can make the crust soggy instead of crispy. If you're unsure, use the toothpick test: insert it into the center—it should come out clean with just a few grits clinging to it.
Garnish and Serve Immediately
Remove the skillet from the oven and let it rest for 2-3 minutes—this gives the grits a chance to set slightly so they're easier to serve. Then, garnish with the 0.25 cup chopped green onions and 0.125 cup fresh basil leaves. The basil adds a fresh contrast to the rich, cheesy grits, while the green onions bring a bright pop of color.
Serve immediately with the 1 tablespoon hot sauce on the side for those who like a little kick. The contrast of the crispy top, creamy interior, and that garlicky cheese flavor in every bite is what makes this dish truly special. Enjoy while it's hot—these grits are at their best straight from the oven!
Pro Tips For Making Baked Garlic Cheese Grits
- Pre-Cook Grits First: Stone-ground grits take forever to soften in the oven—trust me, I’ve learned this the hard way. Simmer them in water or milk for 15-20 minutes until creamy before mixing in the cheese and baking. This guarantees a smooth, velvety texture instead of dry, gritty pockets.
- Roast the Garlic: Raw garlic can overpower the dish. Wrap 4-5 whole cloves in foil, drizzle with olive oil, and roast at 400°F for 10 minutes until soft and mellow. Mash them into the butter and heavy cream—this adds depth without bitterness.
- Don’t Overmix the Cheese: Stir the shredded cheddar just until combined, or you’ll end up with a gluey mess. Lumps melt into golden strands in the oven, and forcing them to dissolve now makes the final texture grainy. A few uneven spots? That’s the good stuff.
- Bake Covered, Then Uncover: Start with the dish covered in foil for the first 20 minutes at 375°F to let the cheese melt evenly. Then uncover and broil for 2-3 minutes—this gives you a crispy, cheesy top without burning the edges. Watch it like a hawk on the last step.
Dietary considerations for this dish
Gluten-Free Adaptation
Stone-ground grits are naturally gluten-free, but always check the package to confirm—some brands process in facilities that handle gluten. For extra insurance, use certified gluten-free grits like Bob’s Red Mill Gluten-Free Grits.
The cooking process remains identical, but I recommend adding 1 tablespoon cornstarch to the grit mixture to help thicken it properly without gluten. The texture will still be creamy with that perfect crispy crust. 🌾
Dairy-Free Options
Skip the butter and use ½ cup dairy-free butter alternative (like Miyoko’s or Earth Balance) for richness. Replace heavy cream with full-fat coconut milk and cheddar with dairy-free sharp cheddar shreds (Violife or Daiya brands work well).
The flavor will be subtly different but still delicious. For the crispy top, use olive oil spray instead of drizzling oil, and top with nutritional yeast for a cheesy flavor without dairy.
Lower-Carb Version
Reduce the grits to 1 cup and stretch the mixture with ½ cup cooked cauliflower rice (sautéed until tender) for a lower-carb adaptation. This keeps the creamy texture while cutting carbs significantly.
The baking time remains the same, but you may need to add an extra 5 minutes to ensure the top crisps properly. Garnish with avocado slices instead of green onions for a fresh, lower-carb touch.
Vegan-Friendly Swap
For a fully plant-based version, use 1.5 cups cooked chickpea flour grits (blend chickpea flour with water for a grits-like texture). Replace butter with vegan olive oil, heavy cream with unsweetened almond milk, and cheddar with vegan mozzarella shreds (Miyoko’s or Follow Your Heart).
The flavor will be milder but still satisfying, and the crispy top works beautifully with the same olive oil technique.
Allergen-Friendly Notes
This recipe is naturally egg-free and nut-free, making it safe for common allergies. If you're avoiding garlic, substitute with asafetida powder (½ tsp)—it mimics garlic’s savory depth without the bulb.
For onion-free versions, skip the green onions and use chives instead. Always double-check ingredient labels, especially for pre-shredded cheeses, which may contain anti-caking agents derived from dairy or soy.
Nutrition facts
Frequently asked questions
Can I make this recipe without heavy cream?
For a lighter version, substitute the 1.5 cups heavy cream with 1 cup whole milk + ½ cup half-and-half. The texture will be slightly less rich but still creamy. If you want maximum creaminess without dairy, use full-fat coconut milk—just note the flavor will be subtly different. The baking process remains the same.
Why did my baked grits turn out gummy instead of creamy?
Gummy grits usually mean one of two things: either you didn't cook them long enough on the stovetop (they need 15-20 minutes of constant stirring), or you didn't reduce the heat after boiling. For the perfect texture, stir constantly on low heat until they reach a polenta-like consistency. If they're still too thin after baking, try adding 1 tablespoon cornstarch mixed with cold water to the grit mixture before baking.
Can I prepare this ahead of time for a dinner party?
Yes! These grits actually taste even better the next day. Assemble the dish up to 24 hours ahead and refrigerate uncovered (this helps develop a firmer crust). When ready to bake, pop it in the oven at 375°F for 25-30 minutes—the extra time will crisp up the top beautifully. For a crowd, double the recipe and use two 9-inch skillets.
What's the best way to reheat leftovers?
Never microwave—it'll turn the crispy top soggy! Instead, cover with foil and reheat at 350°F for 10-15 minutes. For extra crispiness, remove the foil for the last 2-3 minutes of heating. If you want to revive the texture completely, add a splash of heavy cream or milk and stir before reheating to restore creaminess.
Can I use a different type of cheese?
While sharp cheddar is ideal for those gooey rivers, you can experiment! Try Monterey Jack for a milder flavor or Gruyère for nutty depth. For extra richness, mix in ½ cup cream cheese with the shredded cheese. Just remember—cheeses with lower moisture content (like Parmesan) work better for the crispy top layer than soft cheeses like brie.