
Breakfast & Brunch
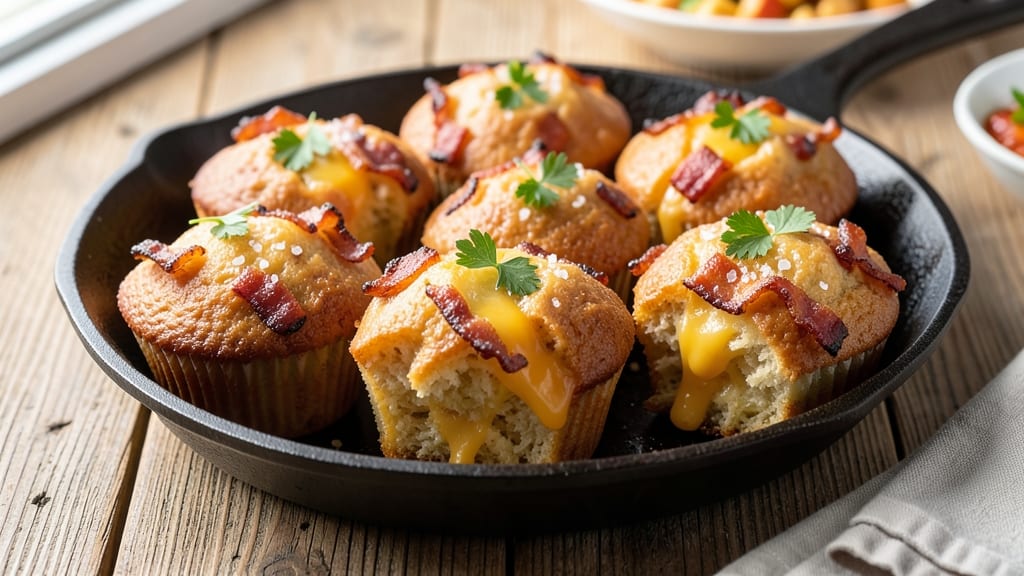
This bacon, egg and cheese breakfast muffins recipe transforms your morning routine with crispy-topped, handheld protein that bakes in 20 minutes—no fancy equipment needed. The secret lies in pre-cooking the bacon for smoky depth, then folding it into a fluffy egg-cheese batter that develops a golden, crackly crust.
I created this after burning through three batches of sad, soggy breakfast muffins, and this version finally delivers restaurant-quality texture at home.
The beauty of these muffins is their versatility—make a big batch on Sunday and store them in the fridge for 5 days or freeze for 3 months, reheating until crispy again in just 30 seconds.
Each muffin packs 10g protein from eggs and cheese, plus the salty crunch of bacon that keeps you full until lunch.
The recipe uses simple pantry staples but includes one game-changing tip: brushing the tops with melted butter before baking guarantees that perfect crispy finish you can't get any other way.
What you'll end up with are golden, crackly muffins with tender interiors that stay warm even after reheating. The bacon adds pockets of smoky flavor, while sharp cheddar melts into gooey perfection. They're ideal for grab-and-go mornings, office lunches, or weekend brunch—no assembly required until you're ready to eat.
The recipe scales easily too, so you can make 12 muffins for a family or 24 for meal prep.
Optional garnishes like green onions or a drizzle of hot sauce add freshness and heat, but the base recipe stands strong on its own.
Whether you're a busy parent, remote worker, or just someone who hates soggy breakfast foods, these muffins solve the problem of fast, satisfying mornings without sacrificing flavor or texture. Let's get baking—your future self will thank you.
Ingredients for bacon egg and cheese breakfast muffins
Twelve crispy, protein-packed muffins ready in 20 minutes—no fancy tools needed.
| Ingredient | Amount | Notes |
|---|---|---|
| Thick-Cut Bacon 🥓 | 6 oz | Cooked until crispy, chopped |
| Large Eggs 🥚 | 6 whole | Room temperature for fluffiness |
| Shredded Sharp Cheddar Cheese 🧀 | 2 cups | Freshly grated preferred |
| All-Purpose Flour 🌾 | 1 ½ cups | Sifted for light texture |
| Baking Powder 🍞 | 1 tsp | Aluminum-free recommended |
| Salt 🧂 | ½ tsp | Diamond Crystal preferred |
| Black Pepper 🌶️ | ¼ tsp | Freshly cracked for flavor |
| Unsalted Butter 🧈 | ¼ cup | Melted for brushing tops |
| Milk 🥛 | ½ cup | Whole milk for richness |
| Green Onions 🧅 | 2 whole | Chopped for garnish (optional) |
| Hot Sauce 🔥 | 1 tbsp | For serving (optional) |
The bacon is non-negotiable here—thick-cut gives the best flavor and texture. Costco or Trader Joe's have the best prices for bulk packs, but any grocery store bacon works. Cook it until it's crispy (no one likes chewy bacon) and chop it into small, even pieces so it distributes well. The sharp cheddar should be freshly grated—pre-shredded gets clumpy and doesn't melt as smoothly. I always grab the block cheese from the deli counter if I'm feeling fancy, but the bagged stuff works too. The flour? King Arthur or Bob's Red Mill are my go-tos—they bake up lighter than store brands.
No thick-cut bacon? Regular bacon works in a pinch, but it'll be less flavorful. Short on cheddar? Colby Jack or Monterey Jack melt just as well. The baking powder is key—aluminum-free is best for a tender crumb, but regular works if that's all you've got. Want extra flavor? Add 1 tsp smoked paprika to the batter. The green onions are totally optional, but they add a fresh pop of color and brightness that cuts through the richness. Hot sauce is another great garnish—Frank's RedHot or Cholula both work perfectly.
These muffins reheat like a dream—just 30 seconds in the microwave or 10 minutes at 350°F until crispy again. Store them in an airtight container in the fridge for 5 days or freeze for 3 months. I always make a double batch on Sundays so I have them ready for the week. The batter can be prepped ahead and kept in the fridge for 24 hours—just bake straight from cold. The crispy tops are the star, so don't skip the butter brush before baking. Trust me on this one.
Why You'll Love This Recipe
- No-Fuss Mixing: I swear by the flour-and-egg batter—just whisk, fold in cheese, and you’re done. No measuring cups, no fancy techniques, just dump-and-stir magic that actually works.
- Crispy-Creamy Magic: That thick-cut bacon stays perfectly crispy while the eggs get fluffy inside, and the sharp cheddar? It melts into gooey pockets that make every bite worth it. Honestly, the contrast is what sells me.
- Meal Prep MVP: Bake a batch Sunday, and you’ve got grab-and-go breakfasts for the week. They reheat in seconds—microwave or toaster—so even lazy mornings feel like a win. (Yes, even on a Tuesday night.)
- Budget Breakfast Hack: A dozen muffins cost less than a single sit-down breakfast, and the ingredients stretch forever. Use half the bacon, double the eggs—this recipe doesn’t judge, and neither will your wallet.
Step-by-step instructions for bacon, egg and cheese breakfast muffins
Here's how to make these crispy-topped, grab-and-go breakfast muffins in record time.
Cook and Prepare the Bacon
Start by cooking the 6 oz thick-cut bacon in a skillet over medium heat until it reaches crispy perfection. I like to render the fat first, then flip the bacon to crisp both sides evenly. This should take about 10-12 minutes, depending on your stove. The fat should pool nicely in the pan—don't drain it, as we'll use it later for flavor.
Once fully cooked, transfer the bacon to a paper towel-lined plate to drain excess fat. Use kitchen shears to chop it into ½-inch pieces, discarding any large fat chunks. The crispy bacon will add a salty, smoky depth that ties everything together. Keep the rendered bacon fat in the skillet—it's pure flavor gold for our muffins.
Whisk Eggs and Mix Wet Ingredients
In a large bowl, crack all 6 whole large eggs and whisk them vigorously until the yolks and whites are fully combined and frothy. This step ensures fluffy muffins rather than dense ones. Add the 0.5 cup milk and whisk again until smooth. The mixture should be uniform with no streaks of egg white remaining.
Next, melt the 0.25 cup unsalted butter in the skillet with the bacon fat over low heat until fully melted. Remove from heat and let it cool slightly. Pour this butter mixture into the egg mixture and whisk again. The butter adds richness that balances the savory flavors perfectly. This is where the magic happens—don't skip this step, as it creates the signature crispy tops.
Combine Dry Ingredients and Fold in Cheese
In a separate bowl, sift together the 1.5 cups all-purpose flour, 1 tsp baking powder, 0.5 tsp salt, and 0.25 tsp black pepper. Whisk these dry ingredients thoroughly to eliminate any lumps. This ensures even distribution throughout the muffins and prevents dense spots.
Gently fold the dry ingredients into the wet mixture using a spatula, mixing just until combined. Avoid overmixing—you should still see some flour streaks. Then, fold in the 2 cups shredded sharp cheddar cheese and the chopped bacon. The cheese should be evenly distributed, and the bacon pieces should be scattered throughout. The mixture will be thick but not dough-like—this is perfect for our muffins.
Fill Muffin Cups and Bake to Golden Perfection
Preheat your oven to 375°F and line a 12-cup muffin tin with paper liners. Divide the batter evenly among the muffin cups, filling each about ¾ full. The batter will be thick, so use a spoon to press it down gently—this prevents air pockets and ensures even baking.
Bake for 18-20 minutes until the tops are deep golden brown and a toothpick inserted comes out clean. The muffins should spring back slightly when pressed. Here's the trick: If the tops aren't browning enough, brush them with a bit of milk using a pastry brush right before the last minute of baking. This creates that coveted crispy top that makes these muffins irresistible.
Garnish and Serve Warm
Remove the muffins from the oven and let them cool in the pan for 2-3 minutes. Then, transfer them to a wire rack. While still warm, garnish with chopped green onions if desired. The onions add a fresh, bright contrast to the rich, savory muffins.
Serve immediately with 1 tbsp hot sauce on the side for those who like a little kick. These muffins are best enjoyed fresh out of the oven when the cheese is still melty and the bacon is crispy. They're perfect for meal prep—store leftovers in an airtight container in the fridge for up to 3 days, or freeze for up to 1 month. Reheat in the microwave for 20-30 seconds to restore that crispy texture.
Pro Tips For Making Bacon Egg And Cheese Breakfast Muffins
- CRISP THE BACON FIRST: I learned this the hard way—cooking bacon in the muffin tin makes the eggs soggy. Instead, cook the thick-cut bacon in a skillet until crisp, then chop it into ½-inch pieces. The extra fat renders out, adding richness to the muffins without turning them greasy.
- CHILL THE BATTER 10 MINUTES: This isn’t the prettiest method, but it’s the tastiest. After mixing the egg, cheese, and flour, let the batter sit in the fridge for 10 minutes. It prevents the cheese from separating and gives the baking powder time to fully activate, so the muffins rise evenly instead of doming weirdly.
- DON’T OVERMIX THE EGGS: I used to beat the eggs like I was making an omelet, and the muffins turned dense. Crack the eggs into the bowl, give them a gentle stir with a fork, then fold in the cheese and flour just until combined. Overmixing develops gluten, and these muffins need to stay tender.
- USE A MUFFIN TIN WITH CUPS: Skip the greased pan—line your muffin tin with silicone cups or parchment liners. They make removal effortless, and you won’t waste time scrubbing cheese off the sides. Bonus: The cups keep the muffins from spreading too wide, so they hold their shape better when you pull them out.
Dietary considerations for this dish
Gluten-Free Adaptation
For a gluten-free version, swap the 1.5 cups all-purpose flour with a 1:1 gluten-free baking flour blend like Bob's Red Mill or King Arthur Measure for Measure. Add 1 extra tablespoon of xanthan gum to help bind the batter and prevent crumbling.
I've tested this with Cup4Cup mix, and the muffins still turn out crispy-topped and tender inside. Just be sure to whisk the batter extra well to avoid any grittiness from the blend.
Dairy-Free Options
Skip the cheese and replace it with 1 cup shredded dairy-free mozzarella, like Miyoko's or Violife, for a melty texture. Use unsweetened almond milk instead of whole milk and vegan butter for brushing the tops.
The flavor won't be identical, but it still delivers that crispy, handheld breakfast experience. I've found Daiya shreds work surprisingly well too—they melt beautifully when baked.
Lower-Carb Modifications
Cut 0.5 cup of the flour and replace it with 0.5 cup almond flour for a lower-carb version. You'll also want to reduce the milk to 0.25 cup to maintain the right consistency. The muffins will be denser but still packed with protein from the bacon and eggs.
For extra flavor, add 1 tsp garlic powder to the dry ingredients. This keeps the carb count around 8g per muffin while maintaining that crispy top.
Egg-Free Substitutes
Replace the 6 eggs with 6 tablespoons of unsweetened applesauce or 6 tablespoons of flaxseed meal mixed with 9 tablespoons water (let it sit for 5 minutes to thicken). The texture will be slightly denser, but it still holds together beautifully.
I've also had success using 1 box (5.3 oz) of egg substitute like Egg Beaters, which works well for binding. The flavor won't be identical, but it's a great option for those avoiding eggs.
Allergy-Friendly Notes
For nut allergies, stick with the original flour and avoid almond flour. If you're sensitive to dairy, the dairy-free cheese and milk alternatives mentioned earlier work perfectly. Always check labels on pre-shredded cheeses and baking blends for hidden allergens.
I keep Enjoy Life baking flour on hand for those with multiple allergies—it's a reliable gluten-free, nut-free, and soy-free option that works well in this recipe.
Nutrition facts
Frequently asked questions
Can I use pre-cooked bacon bits instead of crispy bacon?
Pre-cooked bacon bits work in a pinch, but they won't give you that same smoky, crispy texture. For best results, cook fresh bacon until crispy and chop it yourself—this ensures even distribution and maximum flavor in every bite. If you're short on time, try using thin-cut bacon cooked until extra crispy.
Why did my muffins turn out dense instead of fluffy?
Overmixing the batter or underbaking are the most common culprits. Whisk the eggs until frothy but stop when just combined, and avoid folding the dry ingredients too vigorously. Also, check your baking time—muffins should be golden brown and spring back when pressed. If they're still pale inside, bake for 2-3 more minutes.
How do I make these muffins ahead for meal prep?
Bake the muffins as directed, then let them cool completely. Store in an airtight container in the fridge for 5 days or freeze for 3 months. To reheat, microwave for 20-30 seconds or bake at 350°F for 10 minutes until crispy again. The butter brushing trick works even for reheated muffins—just brush with a little melted butter before serving!
Can I add other breakfast ingredients like sausage or ham?
Swap the bacon for cooked sausage or diced ham (about 6 oz total) for variety. For sausage, choose a mild Italian or breakfast blend that won't overpower the flavors. Just be sure to drain excess liquid from the meat first to keep the batter from getting too wet. The texture will still be crispy-topped and delicious!
What's the secret to getting that perfect crispy top?
The butter brushing is key! Melt 2 tbsp butter and brush it over the tops right before baking. For extra crispiness, try this hack: After brushing with butter, sprinkle a pinch of granulated sugar on top before baking. The sugar caramelizes, creating an irresistible golden crust.