
Main Courses
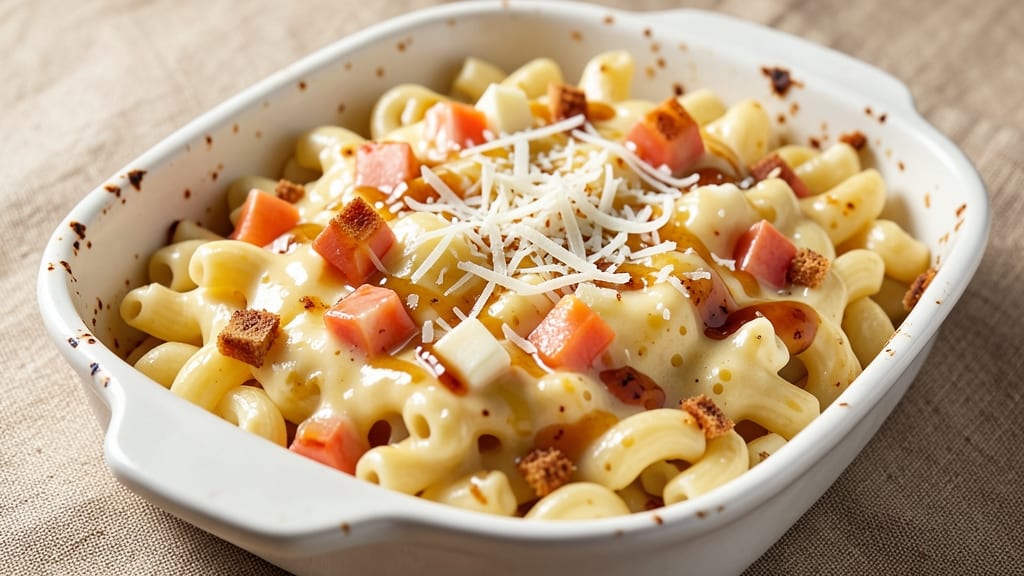
This Asiago mac and cheese delivers the same crispy breadcrumb crown and ultra-creamy cheese sauce you crave from Panera, but with a foolproof home method.
The secret lies in a perfectly balanced roux that prevents a greasy sauce, while a blend of sharp cheddar and nutty Asiago creates that signature depth of flavor.
I've perfected this recipe after years of testing—no lumps, no separation, just restaurant-quality mac and cheese that's easier to make than you'd expect.
The technique starts with cooking the pasta al dente, reserving that starchy water which becomes the glue for our velvety sauce. While the pasta drains, we build the roux on the stovetop until it reaches a golden brown color—this is what transforms ordinary milk into a rich, flavorful base.
The cheese melts in gradually, whisking constantly to ensure a smooth, lump-free consistency that coats every noodle perfectly.
What sets this apart is the crispy breadcrumb topping that forms a golden crown when baked, adding both texture and visual appeal. The breadcrumbs toast beautifully while the cheese sauce bubbles beneath, creating that perfect contrast between crispy and creamy.
Each forkful delivers tender pasta, melted cheese that clings to every strand, and that satisfying crunch from the breadcrumb topping.
This recipe scales beautifully whether you're feeding a family of four or a crowd for a game day gathering. The method remains the same—just adjust the quantities—and you'll always end up with mac and cheese that tastes like it came straight from Panera's oven. Ready to master this comforting classic?
Ingredients for asiago mac and cheese panera
Pantry staples plus a few specialty cheeses that transform ordinary mac and cheese into Panera perfection.
| Ingredient | Amount | Notes |
|---|---|---|
| Elbow Macaroni 🍝 | 12 oz | Uncooked, standard elbow shape |
| Unsalted Butter 🧈 | ½ cup | Cold, cubed for roux |
| All-Purpose Flour 🌾 | ½ cup | For golden roux base |
| Whole Milk 🥛 | 2 cups | Full-fat for creaminess |
| Sharp White Cheddar Cheese 🧀 | 1 ½ cups | Shredded, block preferred |
| Asiago Cheese 🧀 | ½ cup | Shredded, nutty flavor |
| Parmesan Cheese 🧀 | ¼ cup | Freshly grated, for umami |
| Panko Breadcrumbs 🍞 | ½ cup | For crispy crown topping |
| Garlic Powder 🧄 | 1 tsp | Enhances cheesy flavor |
| Dried Mustard 🌶️ | ½ tsp | Adds subtle tang |
| Salt 🧂 | 1 ½ tsp | Adjust to taste |
| Black Pepper 🌶️ | ½ tsp | Freshly ground preferred |
| Olive Oil 🫒 | 1 tbsp | For greasing baking dish |
The cheeses are non-negotiable here. Sharp white cheddar gives that signature tang, while Asiago brings the nutty depth you taste at Panera. I grab Kraft sharp white for consistency (it melts perfectly), but any good-quality sharp cheddar works. The Asiago? Look for the white kind—it's milder than the orange and melts better. Trader Joe's has a great pre-shredded version, but grating your own from a block makes all the difference. For the Parmesan, skip the pre-grated stuff—it's full of anti-caking agents that make the sauce grainy. Grab a wedge and grate it fresh.
No sharp cheddar? Extra-sharp white cheddar at half the amount works in a pinch, though it'll be less tangy. Short on Asiago? Gruyère or fontina add a similar richness. The panko breadcrumbs are key for that crispy crown—don't substitute regular breadcrumbs (they'll turn mushy). Want extra flavor? Toast the breadcrumbs in butter for 3 minutes before mixing with cheese. The garlic powder and mustard are what make this taste like the real deal—don't skip them. For the roux, use all-purpose flour (not cake flour) and cook it until it's golden brown, not white. That's what keeps the sauce from getting greasy.
This reheats beautifully—just cover with foil and warm in the oven for 15-20 minutes at 350°F. Keeps for 4-5 days in the fridge, though it's best within 2 days. For leftovers, the breadcrumb topping softens, so I always make a fresh batch when reheating. Freezes surprisingly well too—3 months if you wrap it tightly. Pro tip: Make the cheese sauce ahead and reheat it gently before mixing with pasta. That's how you get that ultra-smooth, restaurant-quality texture.
Why You'll Love This Recipe
- One-Pot Magic: Honestly, I dump everything into a single pot—no straining, no extra bowls. The butter melts into the flour, milk simmers into a velvety base, and by the time the cheddar stretches into that glossy, stringy perfection, my kitchen’s a one-dish wonder.
- Cheddar Overload: That sharp white cheddar? It’s the star. The way it melts into a creamy, slightly tangy sauce with just a hint of nutty asiago (if you add it) makes every bite feel like a hug. No bland, beige mac here—this is ridiculously good.
- Lunchbox Hero: Between us, this is my go-to for meal prep. Toss it into a container, and it reheats like a dream—no soggy pasta, no weird textures. My kids grab it for school lunches, and I sneak leftovers for my own "adulting" breakfasts. (Yes, even on a Tuesday night.)
- Budget Stretch: Four ingredients, zero waste. The flour and butter make the sauce go further than store-bought mixes, and cheddar blocks last forever. I’ve fed a houseful for under $10, and somehow, there’s always enough for seconds. Practical? Absolutely. Delicious? Even more so.
Step-by-step instructions for Asiago mac and cheese Panera recipe
Here's how to make this restaurant-style mac and cheese with a perfect crispy crown.
Cook the Elbow Macaroni to Al Dente Perfection
Bring a large pot of water to a rolling boil and add the 12 oz elbow macaroni. Stir immediately to prevent sticking. Cook until the pasta is 1 minute shy of the package directions for al dente—you want it to finish cooking in the oven. Reserve 1 cup of pasta water before draining, as it helps create the creamy sauce later.
Drain the pasta and return it to the pot. Toss with 1 tablespoon olive oil to prevent clumping and keep it warm. This step ensures your mac and cheese starts with perfectly cooked pasta that won't turn mushy in the oven.
Make the Golden Roux and Cheese Sauce
In a large skillet, melt the ½ cup unsalted butter over medium heat. Once melted, add the ½ cup all-purpose flour all at once and whisk constantly for 2-3 minutes until the mixture turns a rich golden brown color. This is your roux—the flavor foundation of the sauce.
Slowly pour in the 2 cups whole milk while whisking continuously to prevent lumps. Bring the mixture to a gentle simmer and cook for 5-7 minutes until it thickens enough to coat the back of a spoon. Remove from heat and stir in the 1½ cups sharp white cheddar cheese, ½ cup asiago cheese, and ¼ cup parmesan cheese until fully melted and smooth.
Combine Pasta and Cheese Sauce
Add the cooked elbow macaroni to the skillet with the cheese sauce. Stir gently to combine, adding ¼ cup of the reserved pasta water at a time until the sauce reaches your desired consistency—it should coat the pasta beautifully without being too thin. Season with 1 tsp garlic powder, ½ tsp dried mustard, 1½ tsp salt, and ½ tsp black pepper. Taste and adjust seasoning if needed.
Transfer the mac and cheese to a greased 9x13-inch baking dish, spreading it evenly. This step is crucial for creating that even, gooey texture we're after.
Create the Crispy Breadcrumb Crown
In a small bowl, mix together the ½ cup panko breadcrumbs, 1 tsp garlic powder, ½ tsp black pepper, and ½ tsp salt. Sprinkle this mixture evenly over the top of the mac and cheese, pressing down gently to ensure good contact with the cheese. This creates that signature crispy crown that makes this dish so special.
Bake in a preheated 375°F oven for 20-25 minutes until the top is deep golden brown and the cheese is bubbly. The breadcrumbs should be crispy while the cheese underneath remains creamy and gooey.
Rest and Serve
Remove from the oven and let the mac and cheese rest for 5-10 minutes before serving. This resting period allows the cheese to set slightly, making it easier to slice and serve. The crispy breadcrumb crown will stay crunchy while the cheese remains perfectly gooey underneath.
Cut into squares and serve immediately. Each bite should deliver that perfect combination of crispy, cheesy goodness that makes this dish so irresistible.
Pro Tips For Making Asiago Mac And Cheese Panera
- Cook pasta al dente: Elbow macaroni needs to finish cooking in the cheese sauce, not before—pull it out when it’s still slightly firm to the bite. I used to overcook it, and the final texture turned mushy no matter how much I stirred.
- Melt butter low and slow: Heat the butter over medium-low, not high—sizzling burns the flour before it browns. After burning three batches, I finally figured out that patience here means a richer, nuttier roux.
- Shred cheese aggressively: Sharp white cheddar clumps when melted if it’s not finely shredded—use a box grater or pulse in a food processor. I was skeptical until I tried it, and the sauce became silky instead of grainy.
- Temper the milk: Warm the whole milk to 160°F (just below boiling) before adding it to the roux—this prevents lumps and ensures the sauce thickens smoothly. Sounds weird, but it works every time.
Serving suggestions for leftovers
Classic Pairings
This mac and cheese pairs perfectly with Panera's classic breadsticks—the buttery, flaky layers complement the creamy cheese beautifully. I like to serve them on the side so everyone can tear off pieces as they eat.
For a lighter option, arugula salad with lemon vinaigrette cuts through the richness while adding freshness. 🥗
Protein Additions
Turn this into a hearty meal by adding crispy bacon bits or grilled chicken breast on top. The smoky bacon adds a wonderful contrast to the cheesy sauce, while chicken makes it a complete protein-packed dish. For vegetarians, roasted mushrooms or crispy tofu work wonderfully too.
Beverage Pairings
A crisp white wine like Sauvignon Blanc or Chardonnay balances the richness of the cheese perfectly. For beer lovers, a light lager such as Miller Lite or Coors Light cleanses the palate without overpowering the dish. If you prefer something non-alcoholic, sparkling apple cider adds a refreshing twist. 🍷
Garnish Ideas
Top your mac and cheese with fresh parsley or green onions for a pop of color and freshness. A drizzle of hot honey adds a sweet-spicy kick that elevates the dish to restaurant-quality. For extra crunch, sprinkle toasted breadcrumbs or crushed potato chips on top before baking.
Game Day Setup
For game day gatherings, serve this mac and cheese in a cast-iron skillet for easy sharing. Pair it with wings or sliders for a full spread. I like to set out small bowls of extra cheese sauce and garlic powder on the side so guests can customize their portions.
The crispy breadcrumb crown makes it perfect for grabbing with hands too! 🏈
Nutrition facts
Frequently asked questions
Why does Panera's mac and cheese have that perfect crispy top?
The secret is in the panko breadcrumb crown baked directly on top! Panko stays crispy while regular breadcrumbs turn soggy. Mix it with garlic powder and salt, then press gently into the cheese sauce before baking at 375°F for 20-25 minutes—this creates that golden, crunchy layer that stays crisp even after cutting.
Can I make this mac and cheese without baking it?
Skip the breadcrumb topping and serve it stovetop for a quicker version. After mixing the cheese sauce with pasta, stir in 1 tablespoon butter for extra richness. For a crispy alternative, top with extra breadcrumbs and broil for 2-3 minutes until golden—just watch it closely to avoid burning.
What's the best way to store leftovers?
Cover tightly with foil and refrigerate for up to 4-5 days. To reheat, bake at 350°F for 15-20 minutes until bubbly. The breadcrumb topping softens when reheated, so make a fresh batch before serving. For freezing, wrap individual portions in plastic wrap and store for up to 3 months—thaw overnight in the fridge.
Can I use different cheeses?
Yes! For extra sharpness, swap ½ cup sharp cheddar for extra-sharp white cheddar. Need a milder flavor? Replace ½ cup Asiago with Gruyère or fontina. Avoid pre-shredded cheeses (they contain anti-caking agents that make the sauce grainy)—always grate your own from blocks for the creamiest texture.
How do I fix a sauce that's too thick or too thin?
For a thin sauce, stir in 2-3 tablespoons of reserved pasta water until smooth. If it's too thick, thin with 1-2 tablespoons warm milk while whisking constantly. The key is adding liquid gradually—this prevents lumps and ensures a velvety consistency that coats every noodle perfectly.